Image Presets
The Photography Knowledge Problem
Most people know what they want their image to feel like - intimate, epic, tense, dreamlike. But translating that feeling into a camera description that an AI model can act on is a different skill entirely.
Telling an AI to make a portrait "look cinematic" is underspecified. The result could be anything. But telling it 35mm lens, shallow depth of field, eye-level medium shot with soft bokeh produces something specific, consistent, and repeatable. The problem is that most creators - including experienced photographers - don't have that vocabulary at the ready when they're building a prompt.
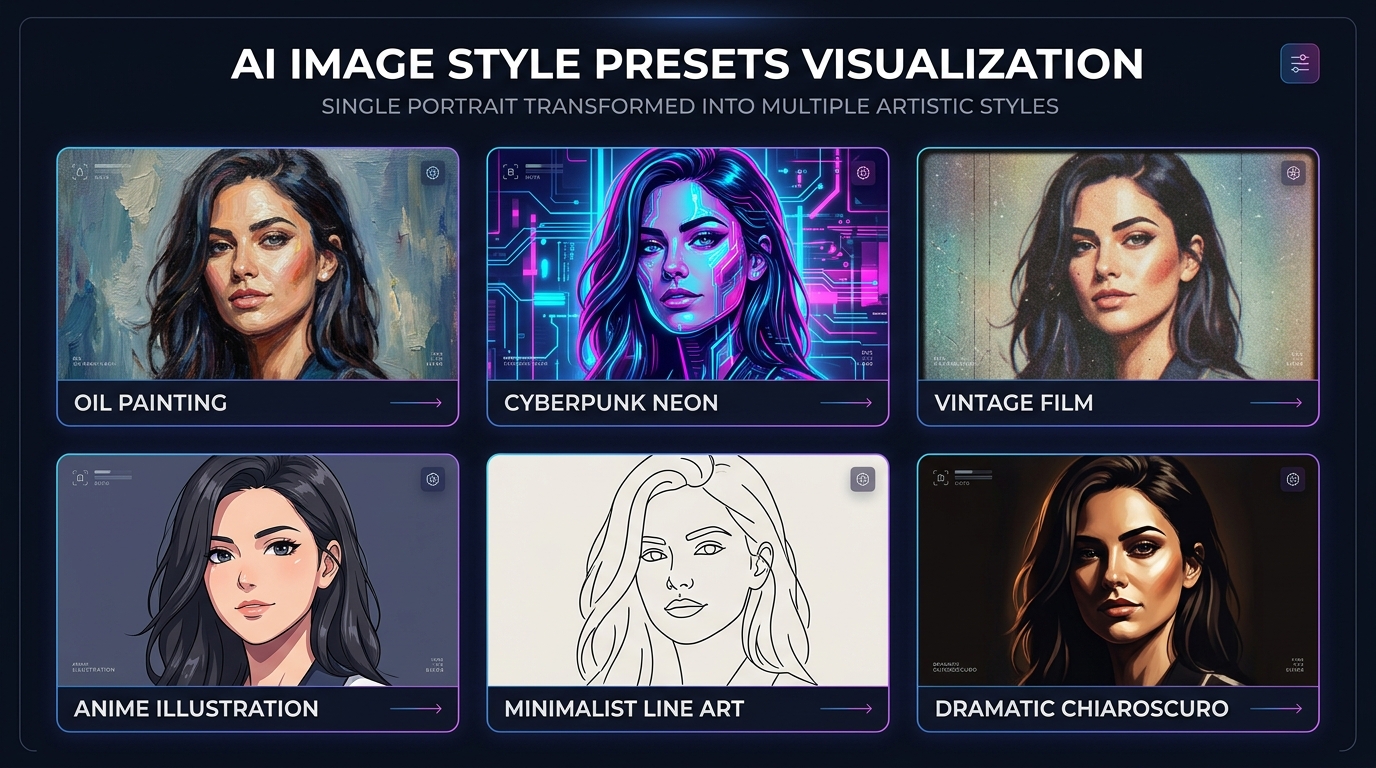
Kolbo.AI's Image Presets system solves exactly this. The presets are organized into four categories: Style, Layout, Camera, and Personas. The Camera category is where all shot-type and lens knowledge lives. Each preset encodes a full cinematographic instruction set so you don't have to write it yourself - you just select it and generate.
Shot Types: What You See and When to Use It
Close-Up & Extreme Close-Up (ECU)
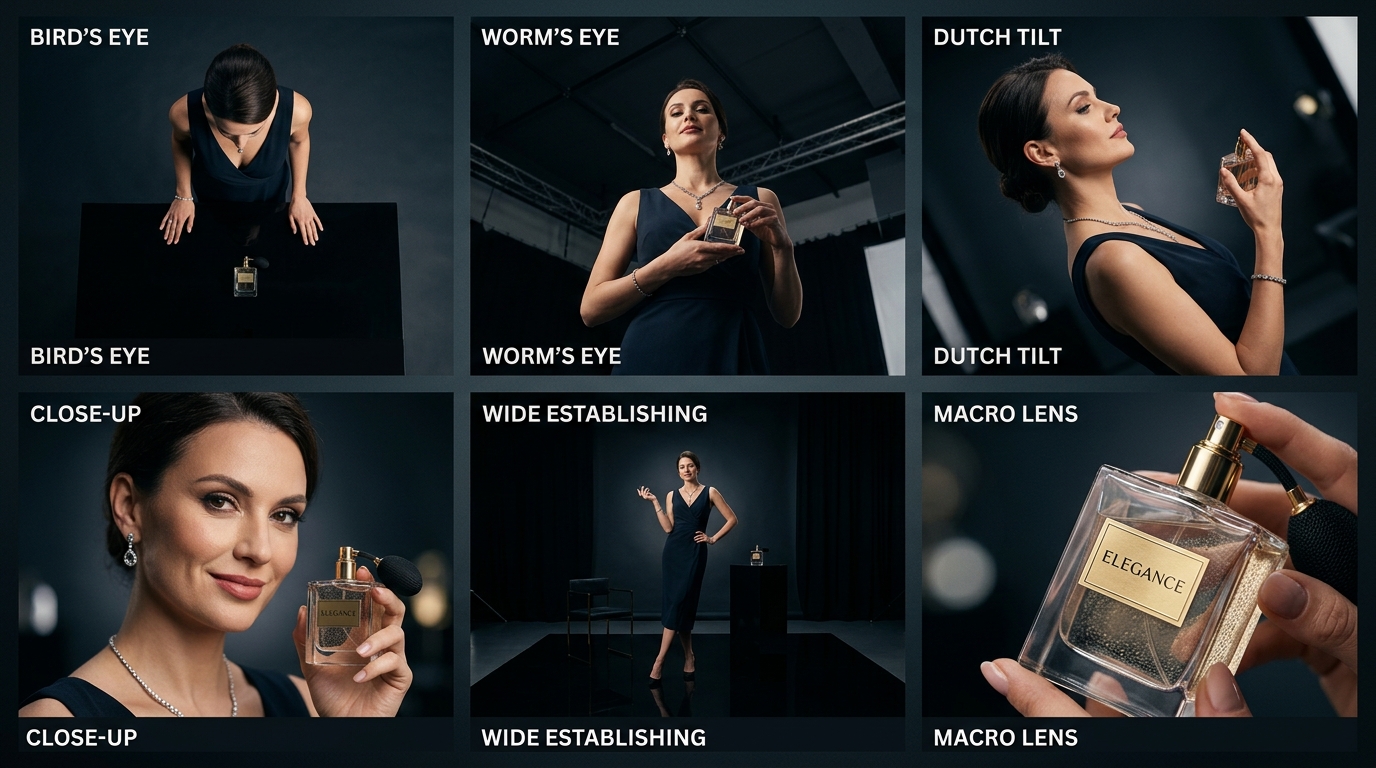
A close-up fills the frame with a face, a hand, or an object. An extreme close-up goes further - a single eye, the texture of a fabric, the liquid surface of a coffee shot. These presets are the go-to for product detail photography, emotional portrait work, and any scene where you want the viewer to feel physically close to the subject.
Use them when detail is the story. A wide shot of a perfume bottle tells the viewer almost nothing. An ECU of the glass stopper catching light tells them everything.
Medium Shot
The medium shot is the workhorse of narrative photography. It frames a subject from roughly the waist up, keeping the face readable while showing enough body language to communicate posture and energy. It's the natural framing for portraits, social content, editorial fashion, and any image where you want human presence without going fully intimate.
Wide Shot & Establishing Shot
Wide shots place the subject inside an environment. The establishing shot is the extreme version - it exists to show where we are before anything else happens. These presets are essential for travel imagery, architectural photography, brand lifestyle shots, and any scene where location is part of the meaning.
If you want the viewer to feel the scale of a city, a landscape, or a venue before you bring them closer, start here.
Bird's Eye View & Worm's Eye View
These angular presets flip the power relationship between subject and viewer. Bird's eye looks straight down, flattening the world into a graphic composition - perfect for flat lay product shots, food photography, and map-style environmental images. Worm's eye shoots upward from ground level, making subjects loom large and imposing - ideal for dramatic architectural shots or giving a character an air of dominance.
Dutch Tilt (Canted Angle)
The Dutch tilt rolls the camera on its axis so the horizon sits at a diagonal. In cinematography it signals psychological tension, instability, or moral ambiguity. In still image generation it adds a stylized, editorial edge that immediately reads as intentional. Use it for fashion editorials, music visual content, anything with a dark or surreal aesthetic.
Drone Aerial
The drone aerial preset synthesizes the look of footage captured from several hundred meters up - sweeping geographic context, miniaturized urban grids, coastal curves, and mountain silhouettes. It's the natural fit for real estate, destination brand content, and cinematic landscape imagery where scale is the entire point.
Lens Simulations: Why Focal Length Is a Storytelling Tool
The lens choice is often more impactful than the framing itself. Different focal lengths distort space in fundamentally different ways, and each distortion carries emotional weight.
Macro Lens
Macro removes distance entirely. It brings the viewer nose-to-surface with textures, patterns, and structures that are invisible at normal scale - fabric weaves, circuit board traces, botanical details, skin texture. Use it when your subject's value lives in its material reality.
Telephoto Compression
Long focal lengths compress the distance between foreground and background, stacking elements together and isolating subjects against buttery-smooth blur. This is the portrait photographer's classic tool - it flatters faces by eliminating wide-angle distortion, and it makes backgrounds feel painterly. The telephoto preset also excels for candid street shots where you want distance between camera and subject.
Wide Angle Distortion
Wide angle lenses exaggerate depth and make spaces feel larger than they are. Close subjects are emphasized while backgrounds recede dramatically. Architectural interiors, environmental portraits, and immersive scenes all benefit from this. The slight barrel distortion at the edges adds energy and a sense of being inside the scene.
Fisheye
The fisheye is deliberate distortion taken to an extreme - a near-180-degree field of view that curves all straight lines and wraps the world into a sphere. Action sports, skate culture, music, and youth-brand content have used this look so consistently that it now carries its own genre associations. It reads as immediate, physical, and fun.
Anamorphic
Anamorphic lenses were developed for widescreen cinema and have a distinct visual signature: a 2.39:1 aspect ratio, oval bokeh, horizontal lens flares, and a subtle barrel distortion that makes everything look like a feature film. The anamorphic preset is the fastest way to give an image pure cinematic DNA - use it for hero shots, key visuals, and any creative that should feel like a movie still.
Camera Control in Image Editing
Generating from scratch is only part of the story. Sometimes you have an image that is nearly right - the composition is close, but the perspective or depth of field isn't landing the way you want. The Image Edit Presets system includes a Camera Control category that lets you apply lens and angle adjustments to existing generated images after the fact.
This is particularly powerful for iteration: generate a solid base image, then use Camera Control edits to push the focal length, shift the angle, or pull the depth of field without regenerating from a blank prompt. It keeps the subject and atmosphere stable while changing only the optical character.
Workflow Tips
Use Camera presets for project consistency. If you are building a content series - a product line, a brand campaign, a social editorial - lock in a camera preset from the start and apply it to every image in the set. Consistent framing and lens character makes a collection look professionally art-directed even when images were generated at different times.
Combine Camera and Style presets. The Camera category tells the AI how to see the scene. The Style category tells it how to render what it sees. A telephoto + film grain style preset gives you a very different result than telephoto + clean editorial. Experiment with combinations systematically: hold the camera preset constant and cycle through styles, then hold the style constant and cycle through cameras.
Start wide, go tighter. When you're not sure which shot type fits a concept, start with an establishing or wide shot to understand the scene, then switch to a close-up or ECU to focus on the detail you actually care about. The wide shot often reveals compositional possibilities the tight shot would have missed.
Ready to generate images that think like a cinematographer?
Kolbo.AI's Camera presets are available right now inside the Image Tools. Every shot type, every lens simulation - one click, no prompt engineering required.
Use code KOLBO30 at checkout for 30% off your first plan.
Photographers and cinematographers spent decades developing the vocabulary of shot types and lenses because it works - it gives creators a shared, precise language for describing what an image should do to the person looking at it. The Camera preset category in Kolbo.AI puts that entire vocabulary into your hands, without requiring you to memorize it.
Pick the frame. Generate the image. Tell a better story. - Zohar
Founder, Kolbo.AI